I really like the Cougar seats too, so I will keep them for at least a year and see how things go. For now, I will drill the extra holes for the original bucket brackets and plug ‘em...that way, as Willy says, I can always change to the Cougar seats down the road...DuckRyder wrote:Nice!
I like the Cougar seats.
Project 'Smokey' - '72 Ranger XLT
Moderator: FORDification
-
Bullitt74

- Preferred User

- Posts: 430
- Joined: Thu Sep 22, 2016 5:34 pm
- Location: Red Deer, Alberta, Canada
Re: Project 'Smokey' - '72 Ranger XLT
Steve F.
Red Deer, Alberta, Canada
'72 Ranger XLT, 4x2, 390-2V, C6, Wind blue & Wimbledon White (‘Smokey’)

2016 F150 Lariat FX4 Supercrew, Ruby Red
Follow my build thread for 'Smokey': http://fordification.com/forum/viewtopi ... 22&t=85070
Red Deer, Alberta, Canada
'72 Ranger XLT, 4x2, 390-2V, C6, Wind blue & Wimbledon White (‘Smokey’)
2016 F150 Lariat FX4 Supercrew, Ruby Red
Follow my build thread for 'Smokey': http://fordification.com/forum/viewtopi ... 22&t=85070
-
Lone Ranger
- Blue Oval Fan

- Posts: 663
- Joined: Tue Jun 21, 2016 2:27 pm
- Location: Northern Michigan
Re: Project 'Smokey' - '72 Ranger XLT
I like both seats as well but for the safety reason with young kids I think the truck seats are smart(you can always switch the seats when your old and don't need safety  That trim turned out great- it really pops! Beautiful truck
1972 f100 4x4 4 inch lift with dump box kit-sold
1969 f250 4x4 highboy in progress.
http://www.fordification.com/forum/view ... 22&t=85251
Kyle
1969 f250 4x4 highboy in progress.
http://www.fordification.com/forum/view ... 22&t=85251
Kyle
-
Bullitt74
- Preferred User
- Posts: 430
- Joined: Thu Sep 22, 2016 5:34 pm
- Location: Red Deer, Alberta, Canada
Re: Project 'Smokey' - '72 Ranger XLT
Willy, you're a genius.cdnwillyg wrote:Steve, I'm with you and use the f150 seats, like you said in the end if you don't like em redo them or use something else!
Hey you are a head of me already putting on the bling, nice looking stuff....all new I take it.
Thanks for the pics, nice to see the truck coming together and way more enjoyable to read too!
Keep it coming!
The adapter plate will require moving the seat base forward a few inches, but there is lots of room to play. The plastic trim pieces on the side of the driver's and passenger seats will hide the seat base completely. I'll check the positioning of the centre jump seat tonight to ensure it will not be too far forward.
The hood trim are the repops from Dennis Carpenter (made in China), as mine were pitted and the black lettering was gone. However, the "Ranger XLT" badging is original with touch-ups from Testors model paint.
Steve F.
Red Deer, Alberta, Canada
'72 Ranger XLT, 4x2, 390-2V, C6, Wind blue & Wimbledon White (‘Smokey’)
2016 F150 Lariat FX4 Supercrew, Ruby Red
Follow my build thread for 'Smokey': http://fordification.com/forum/viewtopi ... 22&t=85070
Red Deer, Alberta, Canada
'72 Ranger XLT, 4x2, 390-2V, C6, Wind blue & Wimbledon White (‘Smokey’)
2016 F150 Lariat FX4 Supercrew, Ruby Red
Follow my build thread for 'Smokey': http://fordification.com/forum/viewtopi ... 22&t=85070
-
cdnwillyg

- Preferred User
- Posts: 364
- Joined: Sun Oct 29, 2017 7:17 pm
- Location: Alberta, Canada
Re: Project 'Smokey' - '72 Ranger XLT
I have found the re-pops not quite the same quality as the original. Some of the stuff I have used is close but out just enough to make it difficult to install, and frustrating. Having said that it is still nice to replace pieces that are to far gone to repair with new. I kept my front re-chromed bumper over the re-pop new bumper on just the finish alone.
Your pieces look great, especially your refinished emblem, good job!
Your pieces look great, especially your refinished emblem, good job!
1968 Mercury M250 Camper Special
FE-390,570CFM 4bbl, C6 Automatic, PS, PB front disk.
Stony Plain, Alberta, Canada
:drive:Willy
FE-390,570CFM 4bbl, C6 Automatic, PS, PB front disk.
Stony Plain, Alberta, Canada
:drive:Willy
-
Bullitt74
- Preferred User
- Posts: 430
- Joined: Thu Sep 22, 2016 5:34 pm
- Location: Red Deer, Alberta, Canada
Re: Project 'Smokey' - '72 Ranger XLT
And that's part of my plan, in providing a review of some of the repop stuff out there. As much as we think we know about these trucks, there is more we can add to the body of knowledge around the bumps.cdnwillyg wrote:I have found the re-pops not quite the same quality as the original. Some of the stuff I have used is close but out just enough to make it difficult to install, and frustrating. Having said that it is still nice to replace pieces that are to far gone to repair with new. I kept my front re-chromed bumper over the re-pop new bumper on just the finish alone.
Your pieces look great, especially your refinished emblem, good job!
Steve F.
Red Deer, Alberta, Canada
'72 Ranger XLT, 4x2, 390-2V, C6, Wind blue & Wimbledon White (‘Smokey’)
2016 F150 Lariat FX4 Supercrew, Ruby Red
Follow my build thread for 'Smokey': http://fordification.com/forum/viewtopi ... 22&t=85070
Red Deer, Alberta, Canada
'72 Ranger XLT, 4x2, 390-2V, C6, Wind blue & Wimbledon White (‘Smokey’)
2016 F150 Lariat FX4 Supercrew, Ruby Red
Follow my build thread for 'Smokey': http://fordification.com/forum/viewtopi ... 22&t=85070
-
popeyes71

- Blue Oval Guru

- Posts: 1176
- Joined: Tue Jan 31, 2012 3:46 pm
- Location: Bay Area, Ca.
Re: Project 'Smokey' - '72 Ranger XLT
That would be great to get a review on some of the reproduction parts. I agree that some of the parts do fall short on being quality reproductions. But there are some pieces that I have got for my truck that are good. Keep up the great progress on your tuck!
-Popeye-
1971 F-250 4x4 Highboy
1966 Chevy Nova, 8 second 10.5 car
1971 F-250 4x4 Highboy
1966 Chevy Nova, 8 second 10.5 car
-
cdnwillyg
- Preferred User
- Posts: 364
- Joined: Sun Oct 29, 2017 7:17 pm
- Location: Alberta, Canada
Re: Project 'Smokey' - '72 Ranger XLT
Hey Steve anything happening on your truck? Been a while.
1968 Mercury M250 Camper Special
FE-390,570CFM 4bbl, C6 Automatic, PS, PB front disk.
Stony Plain, Alberta, Canada
:drive:Willy
FE-390,570CFM 4bbl, C6 Automatic, PS, PB front disk.
Stony Plain, Alberta, Canada
:drive:Willy
-
Bullitt74
- Preferred User
- Posts: 430
- Joined: Thu Sep 22, 2016 5:34 pm
- Location: Red Deer, Alberta, Canada
Re: Project 'Smokey' - '72 Ranger XLT
Not much happening this week - visiting my in laws in Yorkton, Sask. Ordering some parts with my free time, and might head to a wrecker in Elfros, Sask for a few parts that I need (you can see some of what he has on Google Street View). Hoping to get back at things this weekend...
Steve F.
Red Deer, Alberta, Canada
'72 Ranger XLT, 4x2, 390-2V, C6, Wind blue & Wimbledon White (‘Smokey’)
2016 F150 Lariat FX4 Supercrew, Ruby Red
Follow my build thread for 'Smokey': http://fordification.com/forum/viewtopi ... 22&t=85070
Red Deer, Alberta, Canada
'72 Ranger XLT, 4x2, 390-2V, C6, Wind blue & Wimbledon White (‘Smokey’)
2016 F150 Lariat FX4 Supercrew, Ruby Red
Follow my build thread for 'Smokey': http://fordification.com/forum/viewtopi ... 22&t=85070
-
cdnwillyg
- Preferred User
- Posts: 364
- Joined: Sun Oct 29, 2017 7:17 pm
- Location: Alberta, Canada
Re: Project 'Smokey' - '72 Ranger XLT
Sure don't see those trucks up here like he has there that's for sure, good old Sask.
1968 Mercury M250 Camper Special
FE-390,570CFM 4bbl, C6 Automatic, PS, PB front disk.
Stony Plain, Alberta, Canada
:drive:Willy
FE-390,570CFM 4bbl, C6 Automatic, PS, PB front disk.
Stony Plain, Alberta, Canada
:drive:Willy
-
Bullitt74
- Preferred User
- Posts: 430
- Joined: Thu Sep 22, 2016 5:34 pm
- Location: Red Deer, Alberta, Canada
Re: Project 'Smokey' - '72 Ranger XLT
Let’s polish some stainless!!

Steve F.
Red Deer, Alberta, Canada
'72 Ranger XLT, 4x2, 390-2V, C6, Wind blue & Wimbledon White (‘Smokey’)
2016 F150 Lariat FX4 Supercrew, Ruby Red
Follow my build thread for 'Smokey': http://fordification.com/forum/viewtopi ... 22&t=85070
Red Deer, Alberta, Canada
'72 Ranger XLT, 4x2, 390-2V, C6, Wind blue & Wimbledon White (‘Smokey’)
2016 F150 Lariat FX4 Supercrew, Ruby Red
Follow my build thread for 'Smokey': http://fordification.com/forum/viewtopi ... 22&t=85070
-
Manny

- Blue Oval Guru
- Posts: 1190
- Joined: Wed Oct 04, 2006 7:15 pm
- Location: Georgia, Lake City
- Contact:
Re: Project 'Smokey' - '72 Ranger XLT
That's a great idea on a booth!!!! Love it!
Just another Ford fool named Dan.
The Junk that hangs around
67' F-250 highboy Camper special cross breed currently under way
http://www.fordification.com/forum/view ... 22&t=86706
1974 Bronco 302 3 speed
1984 bronco 302 c6 35's
1994 F350 7.3 5spd dually.
The Junk that hangs around
67' F-250 highboy Camper special cross breed currently under way
http://www.fordification.com/forum/view ... 22&t=86706
1974 Bronco 302 3 speed
1984 bronco 302 c6 35's
1994 F350 7.3 5spd dually.
woods wrote: The rust holes in my truck were a factory install (very rare).
-
Bullitt74
- Preferred User
- Posts: 430
- Joined: Thu Sep 22, 2016 5:34 pm
- Location: Red Deer, Alberta, Canada
Re: Project 'Smokey' - '72 Ranger XLT
Thanks Manny! I rig this up whenever I break out my tile saw, as that sucker makes a huge mess...Manny wrote:That's a great idea on a booth!!!! Love it!

Got the back window stainless done...on to the front trim tomorrow...
Steve F.
Red Deer, Alberta, Canada
'72 Ranger XLT, 4x2, 390-2V, C6, Wind blue & Wimbledon White (‘Smokey’)
2016 F150 Lariat FX4 Supercrew, Ruby Red
Follow my build thread for 'Smokey': http://fordification.com/forum/viewtopi ... 22&t=85070
Red Deer, Alberta, Canada
'72 Ranger XLT, 4x2, 390-2V, C6, Wind blue & Wimbledon White (‘Smokey’)
2016 F150 Lariat FX4 Supercrew, Ruby Red
Follow my build thread for 'Smokey': http://fordification.com/forum/viewtopi ... 22&t=85070
-
Bullitt74
- Preferred User
- Posts: 430
- Joined: Thu Sep 22, 2016 5:34 pm
- Location: Red Deer, Alberta, Canada
Re: Project 'Smokey' - '72 Ranger XLT
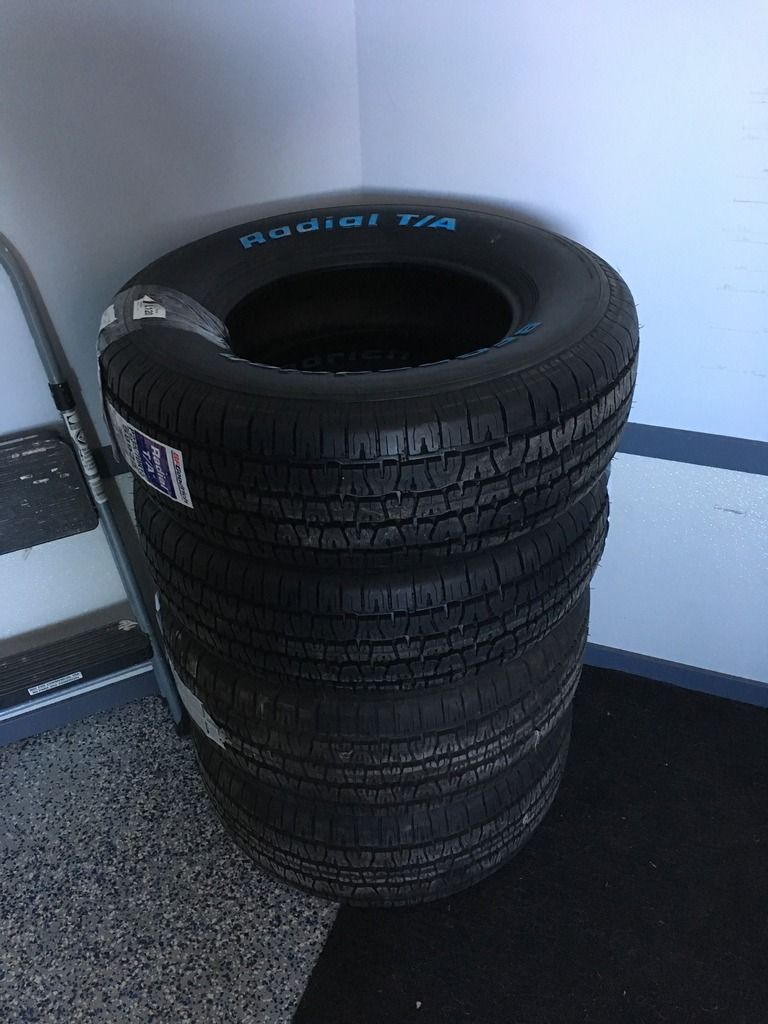
The tire fairy came today 

Steve F.
Red Deer, Alberta, Canada
'72 Ranger XLT, 4x2, 390-2V, C6, Wind blue & Wimbledon White (‘Smokey’)
2016 F150 Lariat FX4 Supercrew, Ruby Red
Follow my build thread for 'Smokey': http://fordification.com/forum/viewtopi ... 22&t=85070
Red Deer, Alberta, Canada
'72 Ranger XLT, 4x2, 390-2V, C6, Wind blue & Wimbledon White (‘Smokey’)
2016 F150 Lariat FX4 Supercrew, Ruby Red
Follow my build thread for 'Smokey': http://fordification.com/forum/viewtopi ... 22&t=85070
-
cdnwillyg
- Preferred User
- Posts: 364
- Joined: Sun Oct 29, 2017 7:17 pm
- Location: Alberta, Canada
Re: Project 'Smokey' - '72 Ranger XLT
Looks real nice Steve, how did your polishing machine work for you?
New shoes too, looks like the truck is getting white lettering or are you running the black-walls out?
Did you go with stock tire size?
How was your trip to the wreckers, find all the parts you needed?
New shoes too, looks like the truck is getting white lettering or are you running the black-walls out?
Did you go with stock tire size?
How was your trip to the wreckers, find all the parts you needed?
1968 Mercury M250 Camper Special
FE-390,570CFM 4bbl, C6 Automatic, PS, PB front disk.
Stony Plain, Alberta, Canada
:drive:Willy
FE-390,570CFM 4bbl, C6 Automatic, PS, PB front disk.
Stony Plain, Alberta, Canada
:drive:Willy
-
Bullitt74
- Preferred User
- Posts: 430
- Joined: Thu Sep 22, 2016 5:34 pm
- Location: Red Deer, Alberta, Canada
Re: Project 'Smokey' - '72 Ranger XLT
Hi all,
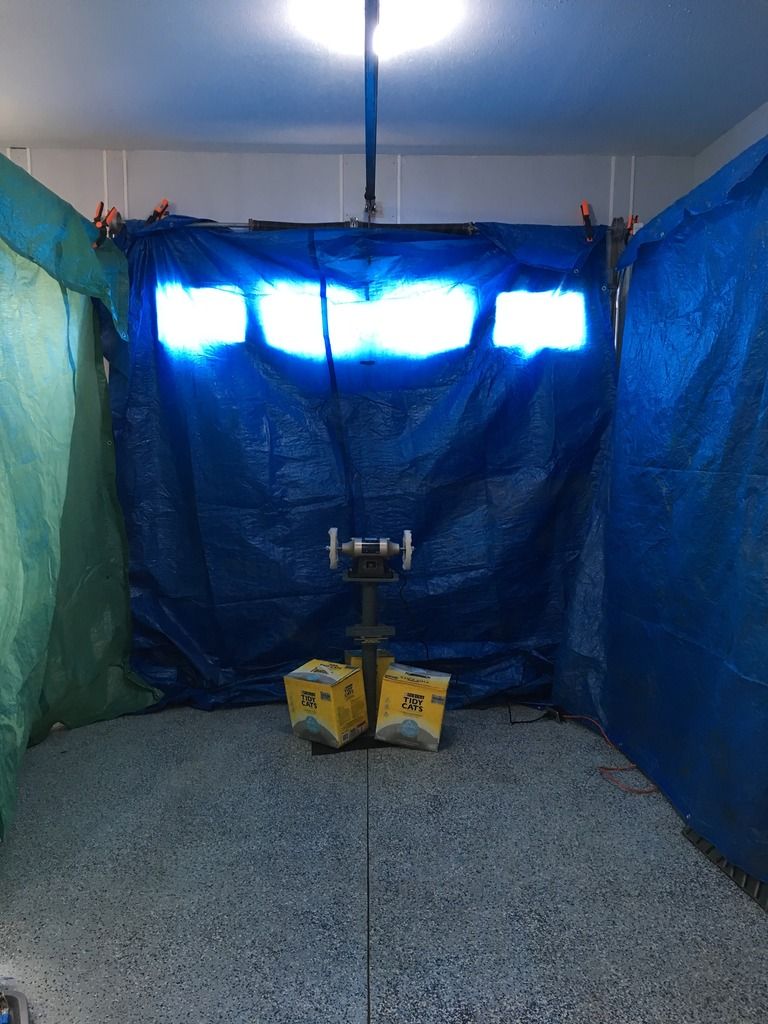
So the polishing went okay - I think stainless steel was a good place to start (tough and more forgiving than aluminum trim), and I started with the back window trim as per my previous post. These pieces needed very little polishing, but if you recall from the start of this thread, Smokey was in a fire which must have spread to the rear window gasket as when I removed the gasket over a year ago, it was like a charcoal brick. The stainless just had a brown haze which needed some grey Scotch Brite initially, and it polished out okay with the stand-mounted polisher (see pic above). I did have a bit of trouble with the inside curves, and probably could have used Jamie's (Ranchero's) advice regarding balling electrical tape up the retaining nut on the outside edge of the polishing wheel. Luckily, I have a spare set, so was able to polish up one nice complete set.
The front stainless was actually a bit tougher. In the prairie provinces, we have a lot of gravel roads with takes a toll on the front half of any vehicle. I watched the YouTube videos on repairing stainless, and took out dings with a variety of tools, mainly a flat b*stard file. This worked pretty good, but left pretty heavy scratches that needed +++ 80 grit sandpaper and a lot of elbow grease to smooth out. I then went to 180, 240, 300, 400, 600 grit dry, then 600 wet sand. I found this didn't get all scratches out, so I re-watched some of the YouTube Videos. I found that it is necessary to sand in the one direction at 30 degrees or so, and do the opposite to get the cross hatch pattern. I spent a lot more time working the 180 grit to get the 80 grit scratches out, and so on, probably sanding at least one hour for each piece with dent repairs, and finishing with 1000, then 1500, then 2000 grit wet sanding. After polishing with the grey stainless compound, then white and red rouge respectively, the result was pretty good, but not quite brand new looking. At that point, I decided "good enough" for a truck, as all of the pieces are still quite shiny and brilliant. Three out of the 6 pieces are literally perfect 10/10 show quality (the driver's side piece is NOS...polished up perfect ). If I would do it all over again, I would use a 120 or 140 grit either between or in place of the 180 grit after the 80 grit, as I don't think the 180 grit is quite enough to get out the 80 grit scratches by hand. Maybe a small dual-action orbital sander would work better at that point.
Some pics:
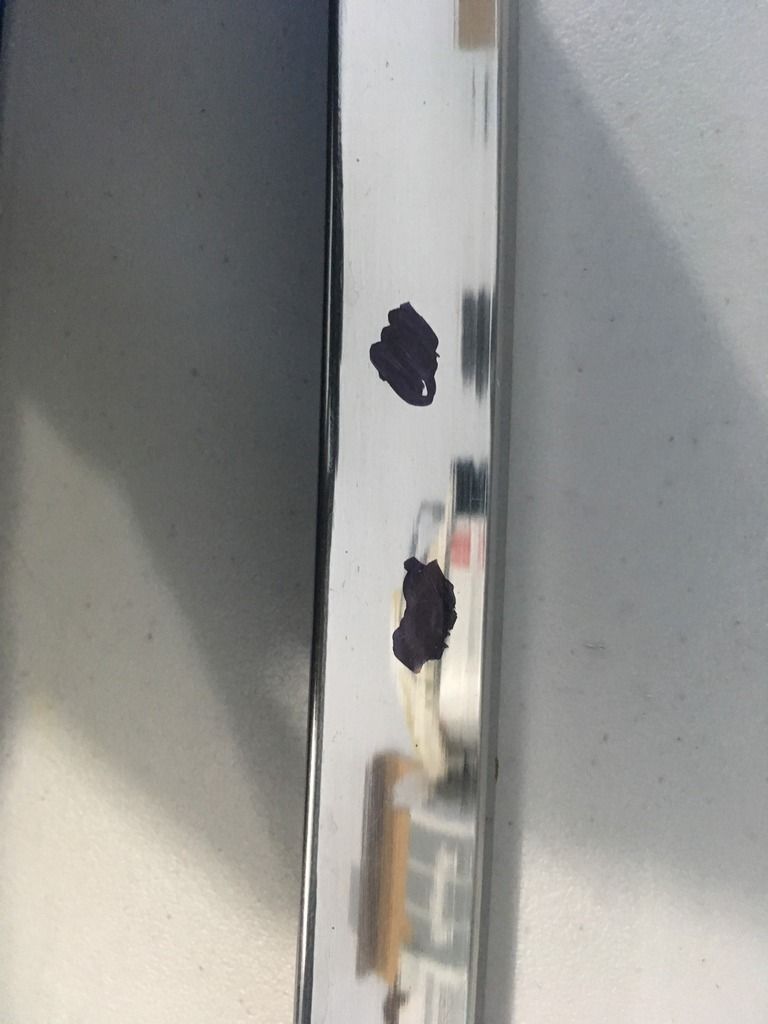
Colored in the dents with a Sharpie to help determine when to stop filing.
Filing away with my "flat b*stard" (seriously, that is what the packaging calls it )
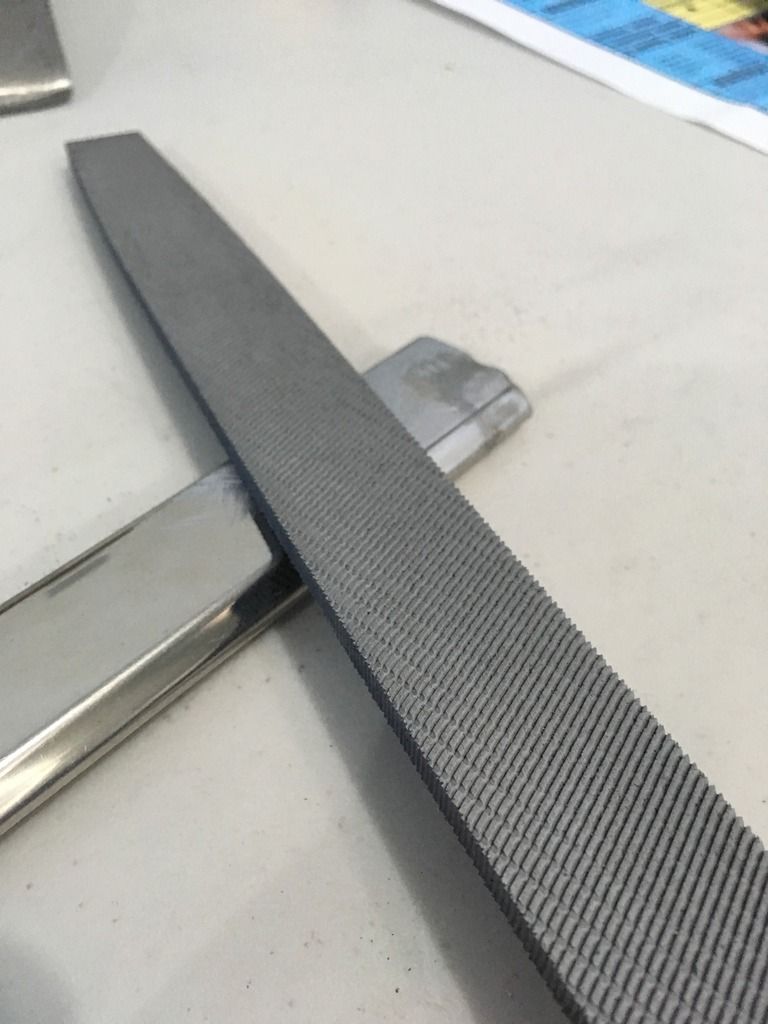
The flat b*stard file that I used - perhaps it is too aggressive as it leaves some fairly deep gouges.
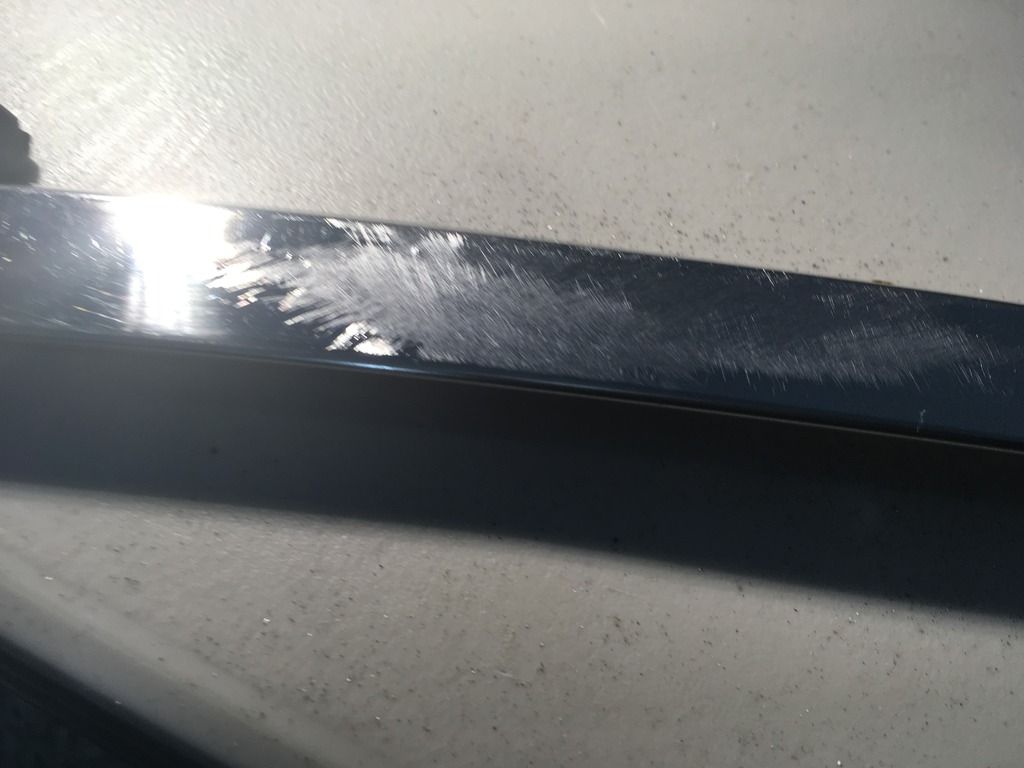
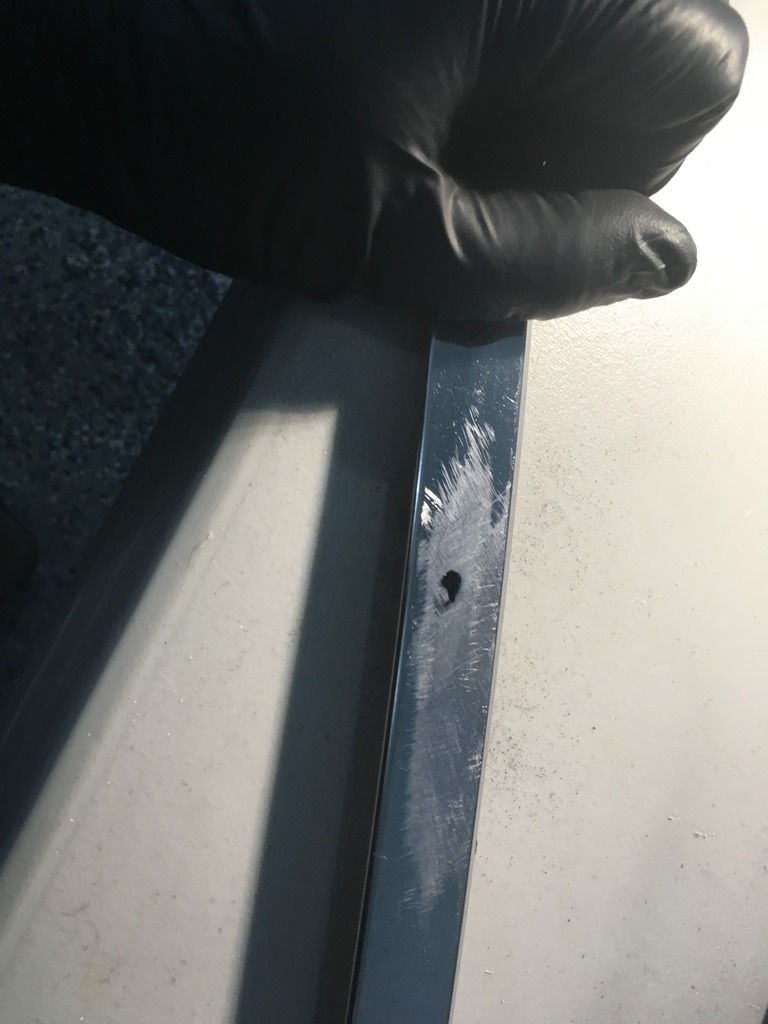
Cross hatch pattern.
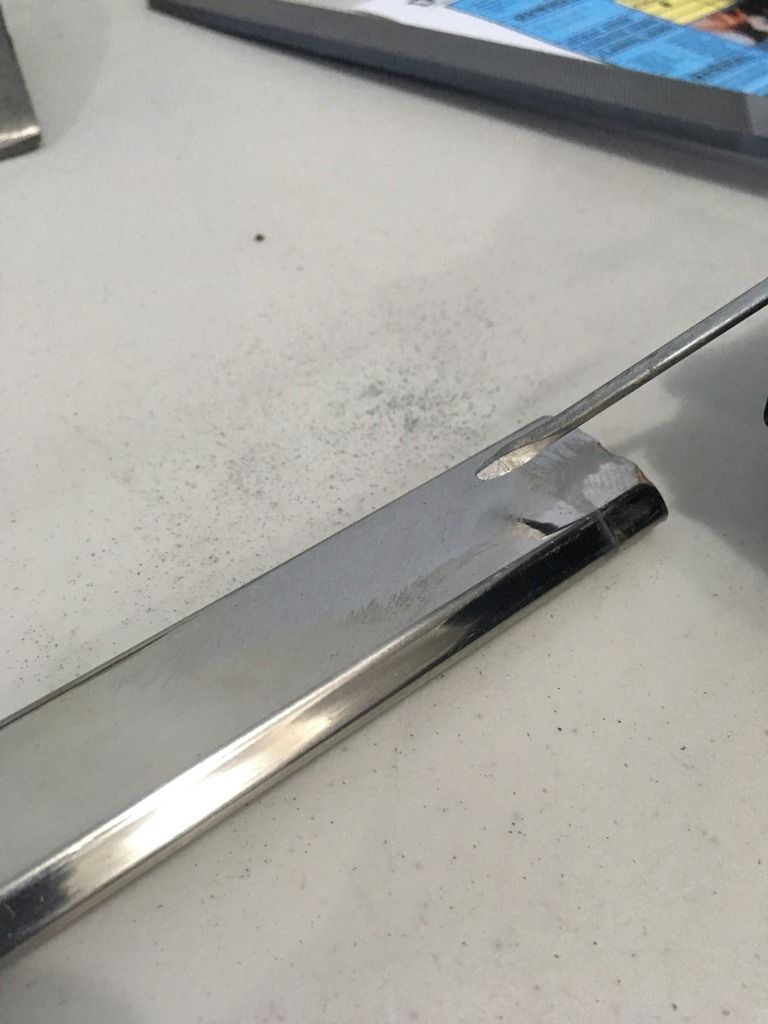
this small screwdriver that I accidentally rounded off the edges has been quite handy. I used it here to push up some dents that I had trouble getting to, as half of these pieces are 2 layers of stainless folded over. I wasn't able to get between the layers of stainless, but did find that those dents were shallow and could be filed flat without filing through the layer entirely.
I'll get out some pics of the finished front trim once they are installed by the glass company - stay tuned!
The stand-mounted polisher took some getting used to. Personal protective equipment is a must (coveralls with no loose cuffs, heavy gloves (I used the heavy latex-dipped ones that allowed me to hang on to pieces), safety googles, dust mask, and face shield), and the "booth" that I configured around my garage door tracks and hardware kept the dust limited to that area of the garage. I found it important to keep control of the piece (no more that 6 inches between my hand and the wheel), as the polisher likes to flip the piece up and hit the shaft or the retaining nut. The curvy or small pieces I used a drill and a bob with compounds, which actually worked okay. I didn't bolt it to the polisher stand to the floor, but found that three 18kg boxes of kitty litter worked very well to hold it down, and I put a layer of rubberized matting for lining tool box drawers which kept the vibrations down and protected my nice epoxy garage floor. The polisher is certainly not for the faint of heart, and deserves a lot of respect (perhaps more than most power tools).
My Western Jr. mirrors will be next on my polishing list. I plan to hit the curved pieces with the drill/bob, and straight sections with the polisher. There will be a few dings to take out on the backs of the mirrors, which should be interesting as I can't get the flat b*stard file on the large flat sections...perhaps 40 grit sandpaper, unless anyone else has a smarter idea...
I will also have to polish my aluminum grille and XLT tailgate trim piece eventually. The stainless has been good practice in working up to those pieces (I think). I plan to practice on a few aluminum pieces that are otherwise scrap. Any comments or advice on my process above, or with polishing aluminum is welcome (either plug it into this thread, or PM me).
So the polishing went okay - I think stainless steel was a good place to start (tough and more forgiving than aluminum trim), and I started with the back window trim as per my previous post. These pieces needed very little polishing, but if you recall from the start of this thread, Smokey was in a fire which must have spread to the rear window gasket as when I removed the gasket over a year ago, it was like a charcoal brick. The stainless just had a brown haze which needed some grey Scotch Brite initially, and it polished out okay with the stand-mounted polisher (see pic above). I did have a bit of trouble with the inside curves, and probably could have used Jamie's (Ranchero's) advice regarding balling electrical tape up the retaining nut on the outside edge of the polishing wheel. Luckily, I have a spare set, so was able to polish up one nice complete set.
The front stainless was actually a bit tougher. In the prairie provinces, we have a lot of gravel roads with takes a toll on the front half of any vehicle. I watched the YouTube videos on repairing stainless, and took out dings with a variety of tools, mainly a flat b*stard file. This worked pretty good, but left pretty heavy scratches that needed +++ 80 grit sandpaper and a lot of elbow grease to smooth out. I then went to 180, 240, 300, 400, 600 grit dry, then 600 wet sand. I found this didn't get all scratches out, so I re-watched some of the YouTube Videos. I found that it is necessary to sand in the one direction at 30 degrees or so, and do the opposite to get the cross hatch pattern. I spent a lot more time working the 180 grit to get the 80 grit scratches out, and so on, probably sanding at least one hour for each piece with dent repairs, and finishing with 1000, then 1500, then 2000 grit wet sanding. After polishing with the grey stainless compound, then white and red rouge respectively, the result was pretty good, but not quite brand new looking. At that point, I decided "good enough" for a truck, as all of the pieces are still quite shiny and brilliant. Three out of the 6 pieces are literally perfect 10/10 show quality (the driver's side piece is NOS...polished up perfect
Some pics:

Colored in the dents with a Sharpie to help determine when to stop filing.

Filing away with my "flat b*stard" (seriously, that is what the packaging calls it

The flat b*stard file that I used - perhaps it is too aggressive as it leaves some fairly deep gouges.

Cross hatch pattern.

this small screwdriver that I accidentally rounded off the edges has been quite handy. I used it here to push up some dents that I had trouble getting to, as half of these pieces are 2 layers of stainless folded over. I wasn't able to get between the layers of stainless, but did find that those dents were shallow and could be filed flat without filing through the layer entirely.
I'll get out some pics of the finished front trim once they are installed by the glass company - stay tuned!
The stand-mounted polisher took some getting used to. Personal protective equipment is a must (coveralls with no loose cuffs, heavy gloves (I used the heavy latex-dipped ones that allowed me to hang on to pieces), safety googles, dust mask, and face shield), and the "booth" that I configured around my garage door tracks and hardware kept the dust limited to that area of the garage. I found it important to keep control of the piece (no more that 6 inches between my hand and the wheel), as the polisher likes to flip the piece up and hit the shaft or the retaining nut. The curvy or small pieces I used a drill and a bob with compounds, which actually worked okay. I didn't bolt it to the polisher stand to the floor, but found that three 18kg boxes of kitty litter worked very well to hold it down, and I put a layer of rubberized matting for lining tool box drawers which kept the vibrations down and protected my nice epoxy garage floor. The polisher is certainly not for the faint of heart, and deserves a lot of respect (perhaps more than most power tools).
My Western Jr. mirrors will be next on my polishing list. I plan to hit the curved pieces with the drill/bob, and straight sections with the polisher. There will be a few dings to take out on the backs of the mirrors, which should be interesting as I can't get the flat b*stard file on the large flat sections...perhaps 40 grit sandpaper, unless anyone else has a smarter idea...
I will also have to polish my aluminum grille and XLT tailgate trim piece eventually. The stainless has been good practice in working up to those pieces (I think). I plan to practice on a few aluminum pieces that are otherwise scrap. Any comments or advice on my process above, or with polishing aluminum is welcome (either plug it into this thread, or PM me).
Steve F.
Red Deer, Alberta, Canada
'72 Ranger XLT, 4x2, 390-2V, C6, Wind blue & Wimbledon White (‘Smokey’)
2016 F150 Lariat FX4 Supercrew, Ruby Red
Follow my build thread for 'Smokey': http://fordification.com/forum/viewtopi ... 22&t=85070
Red Deer, Alberta, Canada
'72 Ranger XLT, 4x2, 390-2V, C6, Wind blue & Wimbledon White (‘Smokey’)
2016 F150 Lariat FX4 Supercrew, Ruby Red
Follow my build thread for 'Smokey': http://fordification.com/forum/viewtopi ... 22&t=85070