Installing a retro Unity model S-6 spotlight on the cowl?
Moderator: FORDification
-
montana_hiboy
- New Member

- Posts: 162
- Joined: Tue Sep 26, 2006 4:34 pm
- Location: Montana
Installing a retro Unity model S-6 spotlight on the cowl?
Is there any way to do this without purchasing the 24" drill bit?
Jim
'75 Ford Highboy 390 4spd
'75 Ford Highboy 390 4spd
-
kaptnkaos

- 100% FORDified!

- Posts: 2029
- Joined: Thu Feb 16, 2006 1:27 am
- Location: Washington, Elma
re: Installing a retro Unity model S-6 spotlight on the cowl
Hey montana_hiboy
Check with Keith... he just did exactly the same install on one of his projects.
KaptnKA S
S
Check with Keith... he just did exactly the same install on one of his projects.
KaptnKA
Washington...The land where rust is like the family pet...Ya learn to live with it and clean up after its mess... KaptnKAOS
"Olde Skool" '68 Ford Bluebird short bus
"FRODO" '68 F-250 Camper Special project
"Olde Skool" '68 Ford Bluebird short bus
"FRODO" '68 F-250 Camper Special project
-
TheEskimo

- Blue Oval Fanatic

- Posts: 932
- Joined: Thu Feb 02, 2006 10:11 pm
- Location: California, Clearlake
- Contact:
You will find it here I believe:
http://www.fordification.com/forum/view ... =spotlight
http://www.fordification.com/forum/view ... =spotlight
-Jason
1972 F250 Camper Special 360ci
1973 F100 Custom 390ci
1985 Thinderbird 302ci (DD)
1972 F250 Camper Special 360ci
1973 F100 Custom 390ci
1985 Thinderbird 302ci (DD)
-
montana_hiboy
- New Member
- Posts: 162
- Joined: Tue Sep 26, 2006 4:34 pm
- Location: Montana
re: Installing a retro Unity model S-6 spotlight on the cowl
thanks kap and eskimo.....did that work out for you keith? it looks like it did....i just picked up an S-6 unity off ebay for 10 bucks sans mounting bracket, they look good plus they're functional, but i realize now the mounting bracket will probably cost me more then the spotlight itself 
Jim
'75 Ford Highboy 390 4spd
'75 Ford Highboy 390 4spd
-
FORDification

- Site & Forum Admin

- Posts: 8050
- Joined: Sun Jul 11, 2004 12:52 am
- Location: Kansas, Wellsville
- Contact:
re: Installing a retro Unity model S-6 spotlight on the cowl
Well, if all you have is the spotlight itself, without any of the mounting hardware, you're pretty much stuck getting the installation kit from Unity, like I did. If all you needed was the mounting bracket, I could help you out there, as I have an extra...but the mounting kit comes with a bunch of other small hardware that you really need to do the installation correctly.
I had another thread where I was posting the information I was learning as I was researching how to mount mine, but I can't seem to find that thread now, so I guess I'll make this one the 'official' Unity thread.
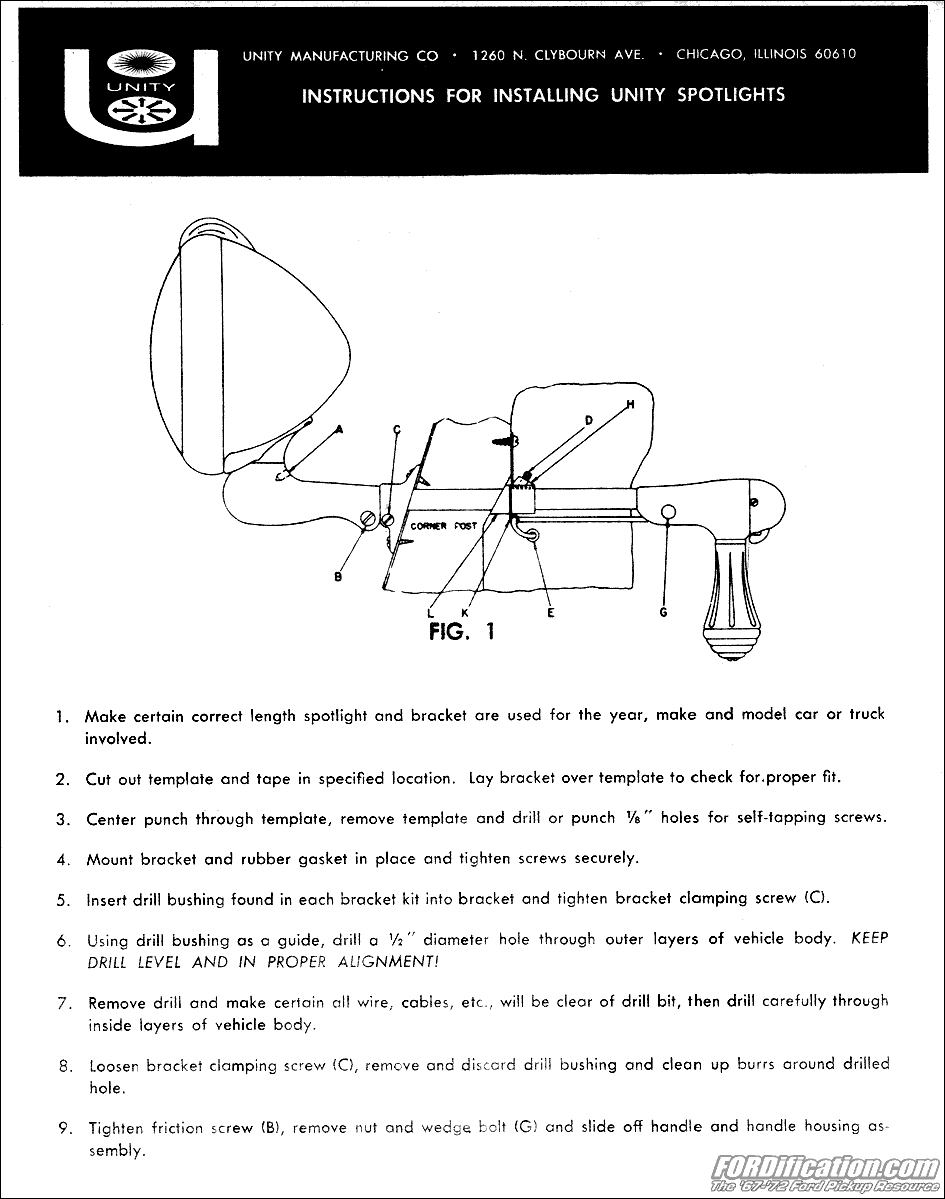
Here's a vintage installation sheet I got from E-bay prior to me buying my own installation kit...before I figured out I NEEDED the kit (click to enlarge):


Here's a few shots of the #185 mounting kit (for the left side) that I got from Unity for $58.56:


This is the special bushing needed to keep the drill bit centered:

...and here's a copy of the mounting template:

When installing mine, I found out you do need a 12"-long drill bit. Unfortunately, I didn't have one...the longest 1/2" bit I was was 6". However, I DID have a 12"-long 1/4" bit, so I decided to see if I could just drill through as far as I could with the 6" bit, and then use the 1/4" bit to drill a 'pilot hole' the rest of the way through the dash, and then use the 1/2" bit from the other side to finish it up. The key would be to keep the 1/4" bit perfect straight in the hole, all the way through...which is a LOT harder than I thought it would be. I did get it pretty close, but not perfect. After I got the cowl area drilled out with the 1/2" bit and then got 1/4" pilot hole all the way through, I went inside and drilled the 1/2" hole to meet up with the existing cowl hole, only to find that it was off a little. So I ended up spending some time widening out the hole on the dash side. By the time I got the hole straightened out enough to slide the spotlight through it, the dash hole was about 1" wide, which is why I ended up using a large flat washer on the dash side, in order to give the inside mounting hardware something to press against. I'm not too worried about it though, since the dashpad will completely cover it up....though I wish now I'd have just spent a few bucks to buy (or borrow) the proper-length drill bit.
I'd have sworn I scanned the installation instructions from the kit, but I can't find the images now, and those pages are now at the shop. I'll see if I can bring those home in the near future to get scanned/posted.
So...in making this as LONG a thread as possible, here's how I dunnit:
I trimmed out the template and held it in place against the cowl as indicated on the template, to mark the mounting holes for the bracket. I used a small punch to dimple the sheetmetal in the appropriate three spots:

I then drilled out the three holes and mounted the bracket. Here's a shot of the mounted bracket, and the drill bushing that needs to be inserted into the end of the bracket:


I then chucked up my 1/4" bit into the drill, and doing my best to eyeball it to keep my 1/4" bit parallel to the existing 1/2" hole, I drilled all the way through to the dash:

Here's a shot taken from under the dash...you can see the path the drill bit takes as it comes through the pillar area:

Like I said before, now that I had a 1/4" pilot hole all the way through, I figured I could use this to drill it out with the 1/2" bit from the dash side. However, by the time I was able to get the two holes completely parallel with each other, the hole in the dash ended up being about 1" in diameter. Here's a shot of the mounted spotlight, and you can see I had to use a large flat washer with a 1/2" hole as a 'thrust plate', to give the retainers something to hold against.

...and here's a close-up of the internal mounting hardware:

You can see my flat washer, and then the beveled rubber insulator, then the retainer and finally the lock collar. This installation is about 98% completed. I still need to attach the retainer to the dash, which will prevent the spotlight from getting pulled out from outside....plus of course the wiring needs to be hooked up, and I have to mount the dashpad to get the hole drilled through it as well.
So...that's how I dunnit. The two pieces of advice I'd have to offer would be to get the mounting kit, and buy/borrow a 12"-long 1/2" drill bit. It'll make the installation go much more smoothly and the install will look professional.
I had another thread where I was posting the information I was learning as I was researching how to mount mine, but I can't seem to find that thread now, so I guess I'll make this one the 'official' Unity thread.
Here's a vintage installation sheet I got from E-bay prior to me buying my own installation kit...before I figured out I NEEDED the kit (click to enlarge):

Here's a few shots of the #185 mounting kit (for the left side) that I got from Unity for $58.56:
This is the special bushing needed to keep the drill bit centered:
...and here's a copy of the mounting template:

When installing mine, I found out you do need a 12"-long drill bit. Unfortunately, I didn't have one...the longest 1/2" bit I was was 6". However, I DID have a 12"-long 1/4" bit, so I decided to see if I could just drill through as far as I could with the 6" bit, and then use the 1/4" bit to drill a 'pilot hole' the rest of the way through the dash, and then use the 1/2" bit from the other side to finish it up. The key would be to keep the 1/4" bit perfect straight in the hole, all the way through...which is a LOT harder than I thought it would be. I did get it pretty close, but not perfect. After I got the cowl area drilled out with the 1/2" bit and then got 1/4" pilot hole all the way through, I went inside and drilled the 1/2" hole to meet up with the existing cowl hole, only to find that it was off a little. So I ended up spending some time widening out the hole on the dash side. By the time I got the hole straightened out enough to slide the spotlight through it, the dash hole was about 1" wide, which is why I ended up using a large flat washer on the dash side, in order to give the inside mounting hardware something to press against. I'm not too worried about it though, since the dashpad will completely cover it up....though I wish now I'd have just spent a few bucks to buy (or borrow) the proper-length drill bit.
I'd have sworn I scanned the installation instructions from the kit, but I can't find the images now, and those pages are now at the shop. I'll see if I can bring those home in the near future to get scanned/posted.
So...in making this as LONG a thread as possible, here's how I dunnit:
I trimmed out the template and held it in place against the cowl as indicated on the template, to mark the mounting holes for the bracket. I used a small punch to dimple the sheetmetal in the appropriate three spots:
I then drilled out the three holes and mounted the bracket. Here's a shot of the mounted bracket, and the drill bushing that needs to be inserted into the end of the bracket:
I then chucked up my 1/4" bit into the drill, and doing my best to eyeball it to keep my 1/4" bit parallel to the existing 1/2" hole, I drilled all the way through to the dash:
Here's a shot taken from under the dash...you can see the path the drill bit takes as it comes through the pillar area:
Like I said before, now that I had a 1/4" pilot hole all the way through, I figured I could use this to drill it out with the 1/2" bit from the dash side. However, by the time I was able to get the two holes completely parallel with each other, the hole in the dash ended up being about 1" in diameter. Here's a shot of the mounted spotlight, and you can see I had to use a large flat washer with a 1/2" hole as a 'thrust plate', to give the retainers something to hold against.
...and here's a close-up of the internal mounting hardware:
You can see my flat washer, and then the beveled rubber insulator, then the retainer and finally the lock collar. This installation is about 98% completed. I still need to attach the retainer to the dash, which will prevent the spotlight from getting pulled out from outside....plus of course the wiring needs to be hooked up, and I have to mount the dashpad to get the hole drilled through it as well.
So...that's how I dunnit. The two pieces of advice I'd have to offer would be to get the mounting kit, and buy/borrow a 12"-long 1/2" drill bit. It'll make the installation go much more smoothly and the install will look professional.
____| \__
-O-----O- Keith
'67 F-100 2WD SWB ~ '69 F-100 4WD SWB w/7" chop ~ 1975 F-250 Ranger XLT Supercab Camper Special

My '67 restoration video
-> Posting and you! <-a MUST watch for all!!
-O-----O- Keith
'67 F-100 2WD SWB ~ '69 F-100 4WD SWB w/7" chop ~ 1975 F-250 Ranger XLT Supercab Camper Special
My '67 restoration video
-> Posting and you! <-a MUST watch for all!!
-
montana_hiboy
- New Member
- Posts: 162
- Joined: Tue Sep 26, 2006 4:34 pm
- Location: Montana
re: Installing a retro Unity model S-6 spotlight on the cowl
looks like a pretty clean install to me keith, were you happy with the end result? i've been following these unity lamps on ebay for a few weeks now and almost none of them come with the mounting hardware so i finally just bought one anyway, it's just the lamp, shaft, handle and wiring, the mounting hardware never seems to be included, but i'm gonna try the same approach as you, coming from both sides with a shorter drill bit and i hope i hit home, thanks for the pics 
Jim
'75 Ford Highboy 390 4spd
'75 Ford Highboy 390 4spd
-
FORDification
- Site & Forum Admin
- Posts: 8050
- Joined: Sun Jul 11, 2004 12:52 am
- Location: Kansas, Wellsville
- Contact:
re: Installing a retro Unity model S-6 spotlight on the cowl
I can tell you that it'll be virtually impossible to get this done without at least a pilot hole all the way through. By the time you get both holes lined up enough to get the spotlight shaft through, your dash is going to be seriously hacked up...and you're not going to be happy with the results. I know we all try to cut some corners to save a few dollars, but I'd strongly recommend getting your hands on the 12"-long 1/2" drill bit.
The thing you have to keep in mind is that you're not drilling through flat steel. You're drilling through several pieces at an angle, and the drill bit WILL tend to wander around. You only have one chance to get it done right....so don't mess it up!
The thing you have to keep in mind is that you're not drilling through flat steel. You're drilling through several pieces at an angle, and the drill bit WILL tend to wander around. You only have one chance to get it done right....so don't mess it up!
____| \__
-O-----O- Keith
'67 F-100 2WD SWB ~ '69 F-100 4WD SWB w/7" chop ~ 1975 F-250 Ranger XLT Supercab Camper Special
My '67 restoration video
-> Posting and you! <-a MUST watch for all!!
-O-----O- Keith
'67 F-100 2WD SWB ~ '69 F-100 4WD SWB w/7" chop ~ 1975 F-250 Ranger XLT Supercab Camper Special
My '67 restoration video
-> Posting and you! <-a MUST watch for all!!
-
fordman
- 100% FORDified!
- Posts: 22329
- Joined: Sun Aug 28, 2005 8:17 pm
- Location: Kansas, Ottawa
- Contact:
its funny. all of my life i always wanted a truck with a light on it like these. well i am now grown up. and i have a truck and i have one of the lights with everything for it. but now i dont want to drill any holes in my truck to put it on the truck. what do you do? my plans are to forget the light. i cant get myself to drill any holes in my truck. maybe some day ill get a truck with a light already in it.
-
foghorn
- Blue Oval Fanatic
- Posts: 889
- Joined: Thu Jul 20, 2006 4:29 am
- Location: Oklahoma, Wagoner
- Contact:
re: Installing a retro Unity model S-6 spotlight on the cowl
Foggy
Work is for people that dont know how to fish
-
montana_hiboy
- New Member
- Posts: 162
- Joined: Tue Sep 26, 2006 4:34 pm
- Location: Montana
Re: re: Installing a retro Unity model S-6 spotlight on the
point well taken, i did notice you were dealing with a stripped down dash, which left you a little more room for error i'm guessing, though not much, i'm considering just taking a piece of 1/2" round stock and welding it to an old 1/2" drill bit, i know it will wobble and wander somewhat but it may be more accurate then coming in from the opposite side blind, but i could be wrong ...FORDification wrote:I can tell you that it'll be virtually impossible to get this done without at least a pilot hole all the way through. By the time you get both holes lined up enough to get the spotlight shaft through, your dash is going to be seriously hacked up...and you're not going to be happy with the results. I know we all try to cut some corners to save a few dollars, but I'd strongly recommend getting your hands on the 12"-long 1/2" drill bit.
The thing you have to keep in mind is that you're not drilling through flat steel. You're drilling through several pieces at an angle, and the drill bit WILL tend to wander around. You only have one chance to get it done right....so don't mess it up!
Jim
'75 Ford Highboy 390 4spd
'75 Ford Highboy 390 4spd